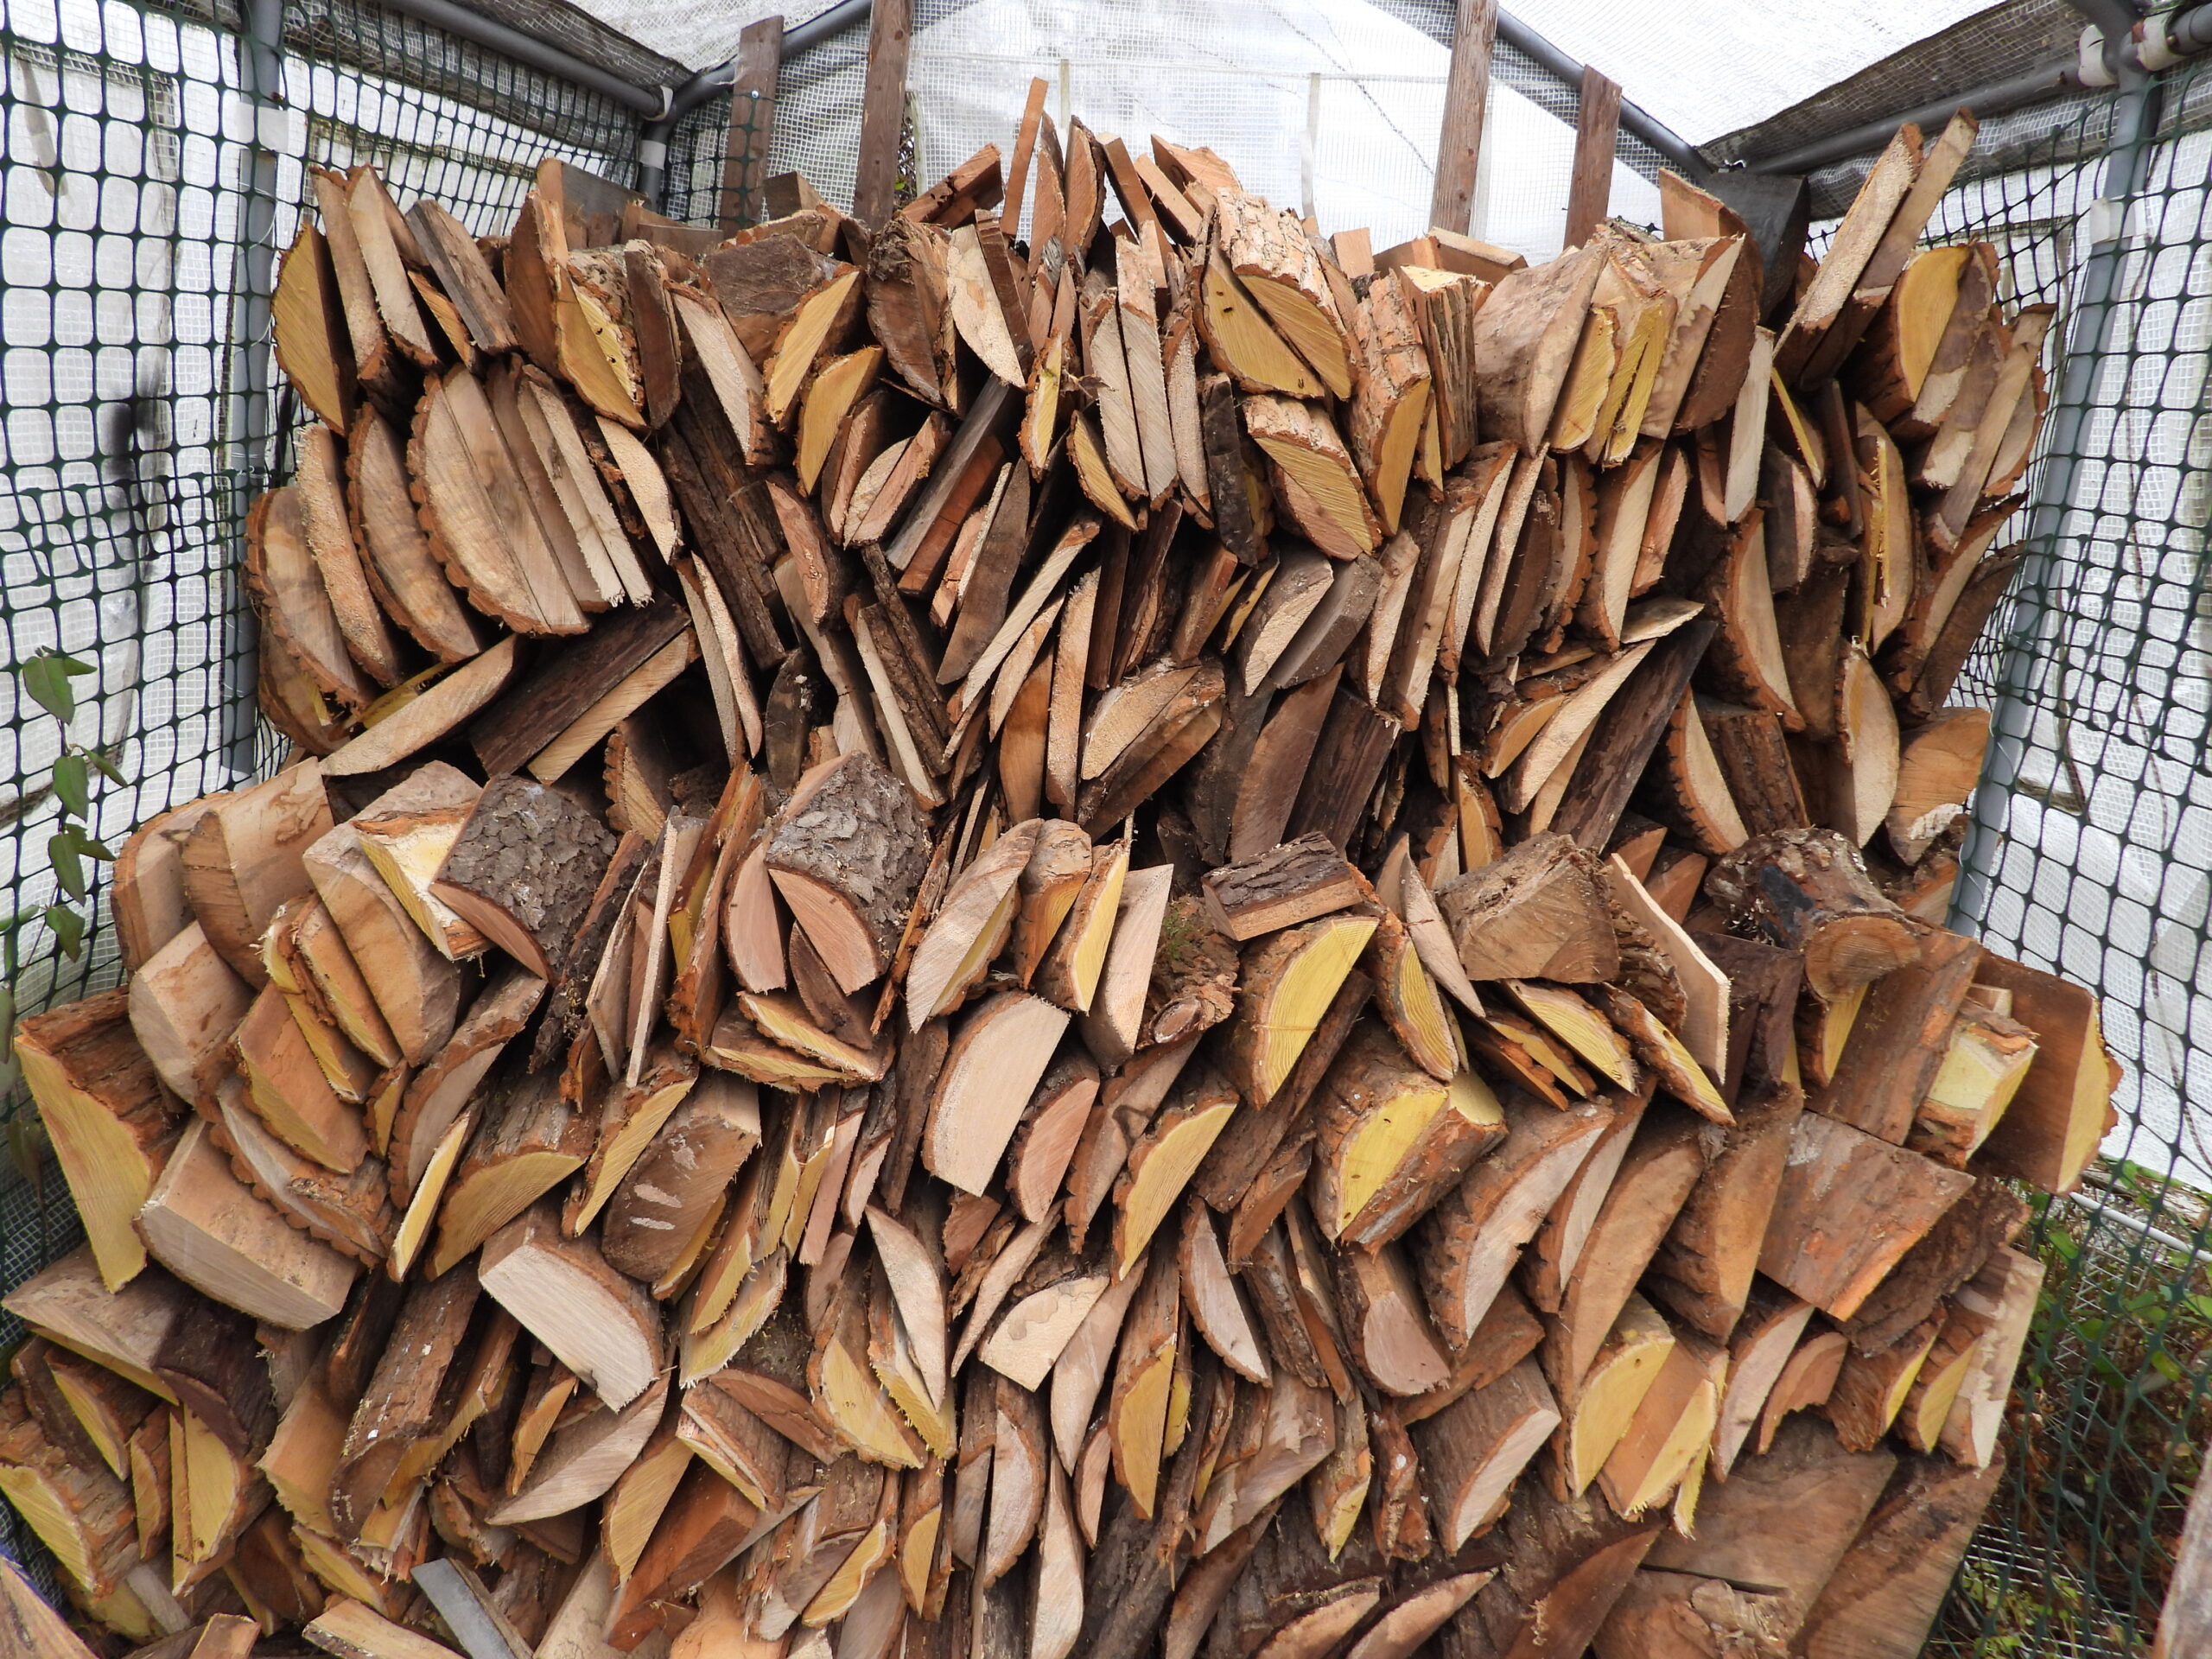
We got all those wood mill scraps cut up and stacked in the woodshed.

 As long-time readers are aware, Mark’s a big believer in building your way out of repetitive or unpleasant homesteading tasks. So I get to enjoy his amazing caterpillar tunnels, porch-top planter boxes, anti-chipmunk strawberry beds, anti-bird raspberry area, and deer-proof garden fence.
Now, after a year of making me talk in front of a camera then plunking Mark down in front of editing software, you can enjoy a deep dive into each of those projects. For another day or two, you can even nab your copy at 50% off!
This is our second video course and I hope it comes across as tighter, more informative, and more entertaining than the first one. (It certainly felt that way to me, but maybe I’m just getting over my annoyance at seeing myself in moving pictures.)
 As a bonus, Udemy courses come with a lifetime subscription to updates. For example, folks in our Soil-First Gardening Course paid up front for an hour-long course just like this one, then got a bonus half hour of cover-crop information a few months later totally free even though the course increased in price by $10 at the same time.
Which is a long way of saying — I hope you’ll grab a copy now while DIY Gardening Projects is brand new and the cheapest it will ever be! if you really want to make our day, please consider leaving a review after you watch. Reviews not only help strangers decide to take a chance on our courses, they also give us ideas of what to add and how to do better next time.
Happy learning!

Advoko MAKES on You tube has been experimenting with using plastic bottles to farm bees.
It seems to be cheaper and easier. That big bottle is a European recycled beer keg.
He has even configured one of his hives to make the top bottle reachable from inside his house!
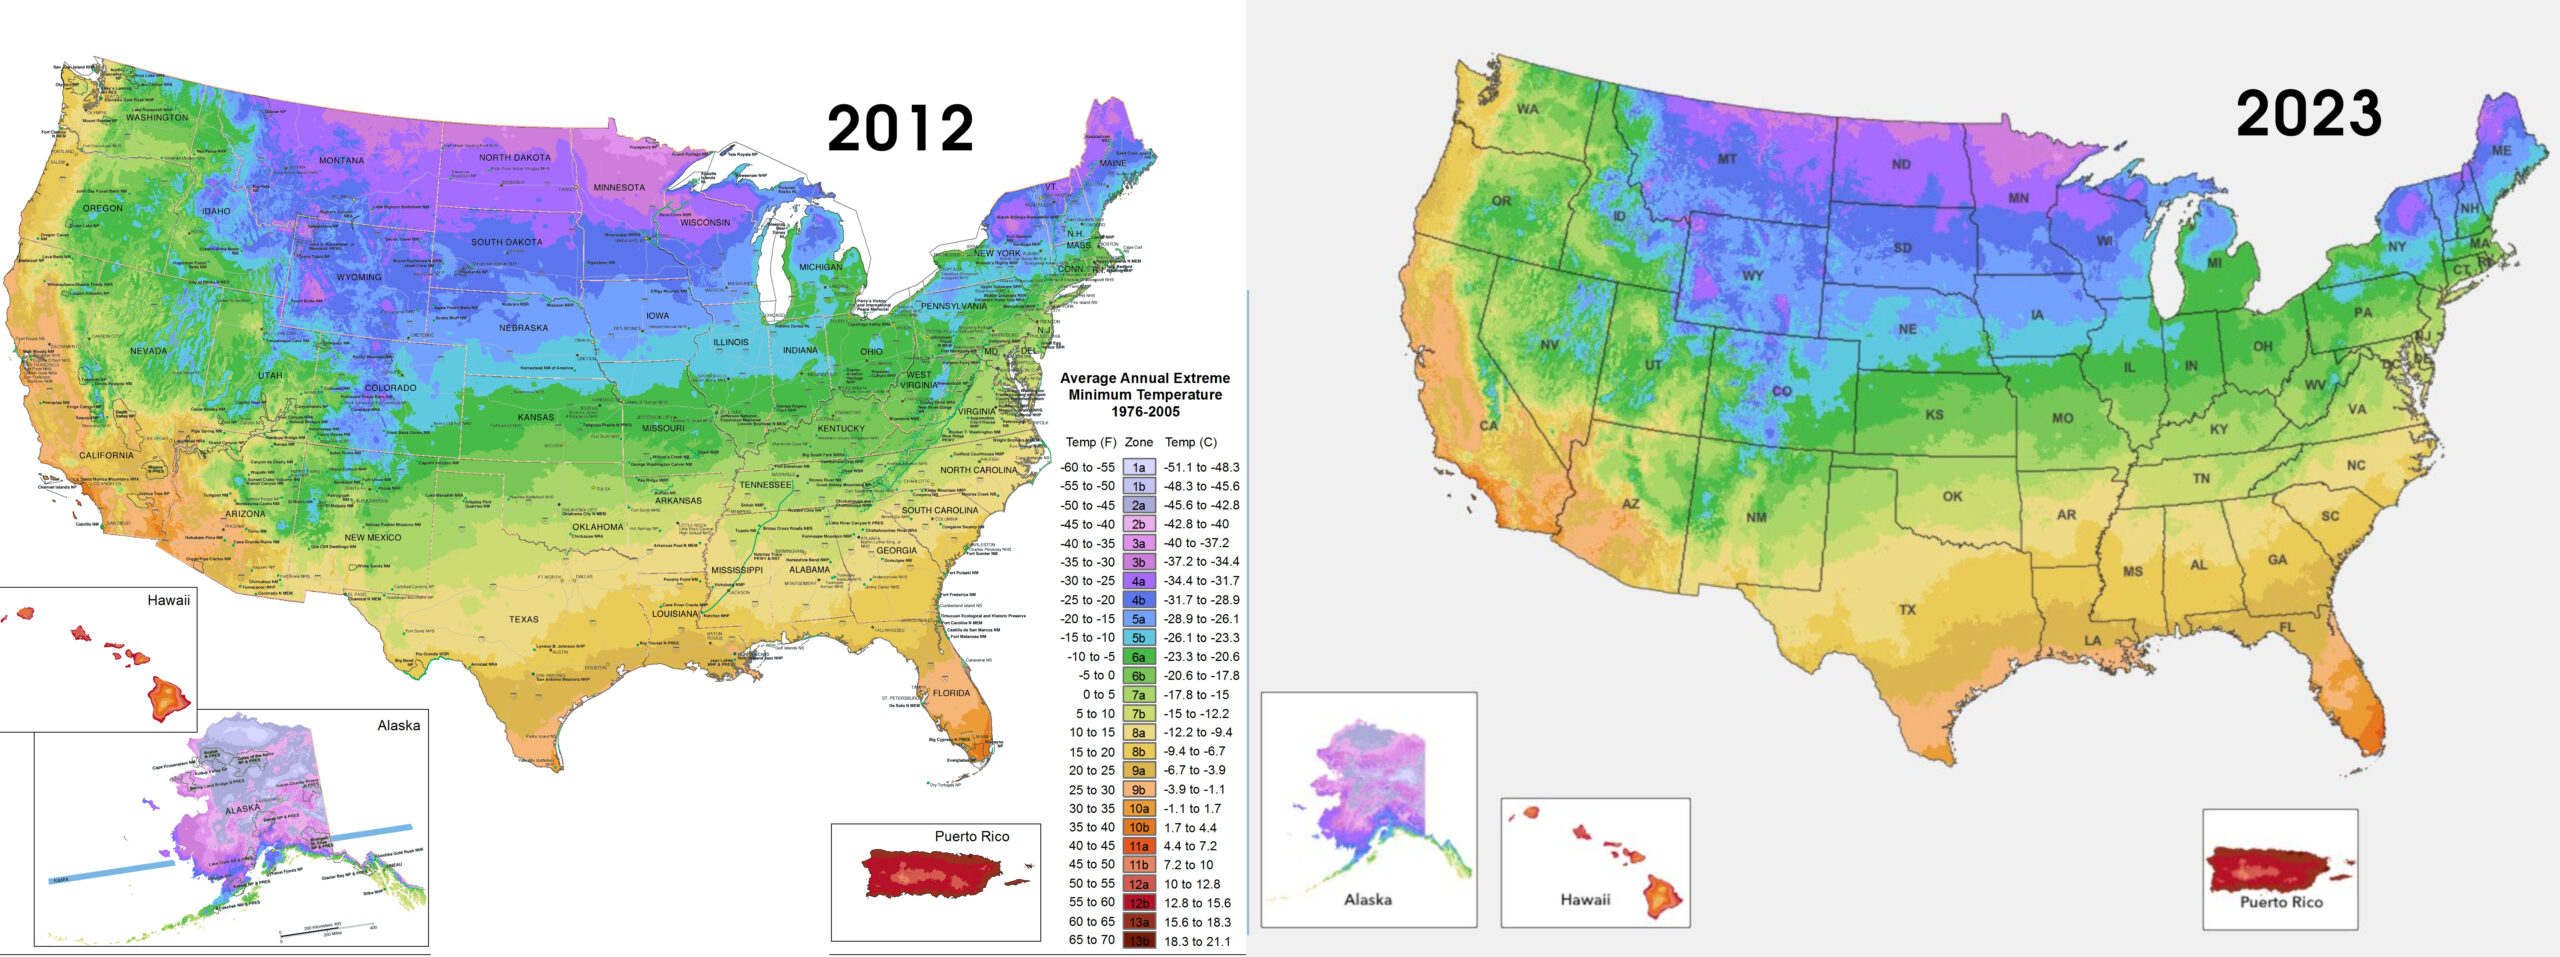
Perhaps you’ve seen the new USDA hardiness zone map that came out this week? For the first time in eleven years, we have an updated map, and about half of the United States moved half a zone warmer (with the rest staying in the same zone they were in before). You can check your new zone here.
Before you rush out and buy tropical trees to plant in your garden, though, I thought I’d share a few thoughts from our last fifteen-plus years growing fruit.
 First, you need to understand what the zone map really means. It’s a thirty-year average of annual extreme low temperatures in your location.
In other words, that’s the coldest it’s likely to get in your garden on an average year — so sometimes the temperature will never drop that low and sometimes you’ll see a freak cold spell that dips even lower. In fact, as the climate changes, unusual cold waves (and heat waves) are becoming more common, so my biggest piece of advice is this:
Be conservative when picking out those fruit trees! Maybe don’t choose a fig that’s only on the edge of hardy where you’re located. Instead, if you live in zone 6b (as we now do), it’s smarter to select varieties hardy to at least zone 6a. This is especially true for fruit plants that take several years to mature.
 While you’re planning smart, be sure to consider microclimates. Even though the area we moved from is technically half a zone warmer than the one we’re in now (meaning we moved from zone 6b to zone 6a…which is now zone 6b!), our hilltop tends to evade early and late freezes that would have definitely struck our previous deep-valley pocket.
So no matter what the map claims, believe your eyes if they say you’re actually half a zone colder or warmer than your neighbors. And consider late freezes prone to result in fruitless years when selecting varieties — late bloomers can be a major plus.
 Finally, it’s worth looking at the flip side of the coin. The hardiness zone maps don’t say anything about annual high temperatures or droughts, but for many of us both of those climate concerns are increasingly relevant in our gardens.
For example, despite drip irrigation, our hilltop gets so bone dry during scorching summers that I keep losing shallow-rooted blueberry plants. I intend to move the survivors to a wetter location (which I’ll tell you about in a later post). For now, just remember that there’s a lot more to keeping fruit plants happy than making sure they evade the worst winter ice.
If you want to read more of my thoughts on choosing fruit plants that will produce with minimal headache on your part, definitely check out my Weekend Homesteader: Winter ebook (or nab the full series in paperback form).
And I’d love to hear from you. How are you changing your gardening plans in response to the new maps?
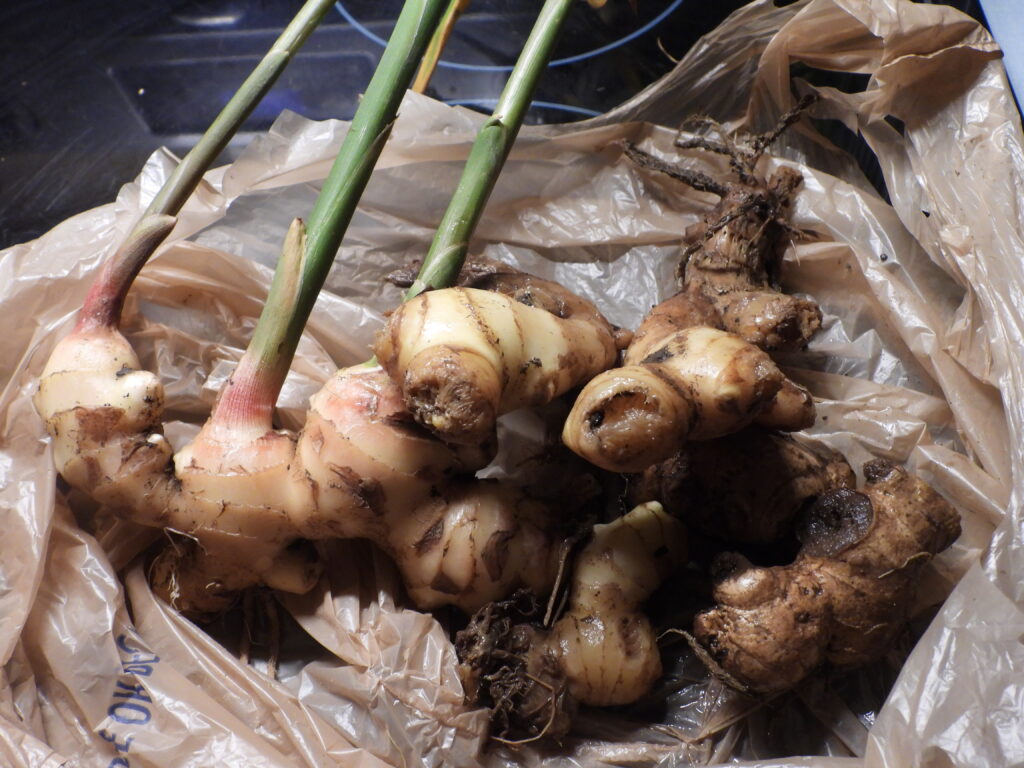
Last year, I wrote that, when growing ginger in the home garden, you should wait to harvest until after the leaves die back in the autumn. Now I’m not so sure that’s true.
This data isn’t actually from my own garden (although I am eating the result!). It all started when Mark’s mom cut up one rhizome to grow in a corner of a garden bed for my sake. “Harvest whenever you want,” she said.
When Mark and I dropped by at the end of September, the ginger plants still seemed to be growing so I decided to wait. But between then and the end of October, a light frost killed back all of the plants except one.
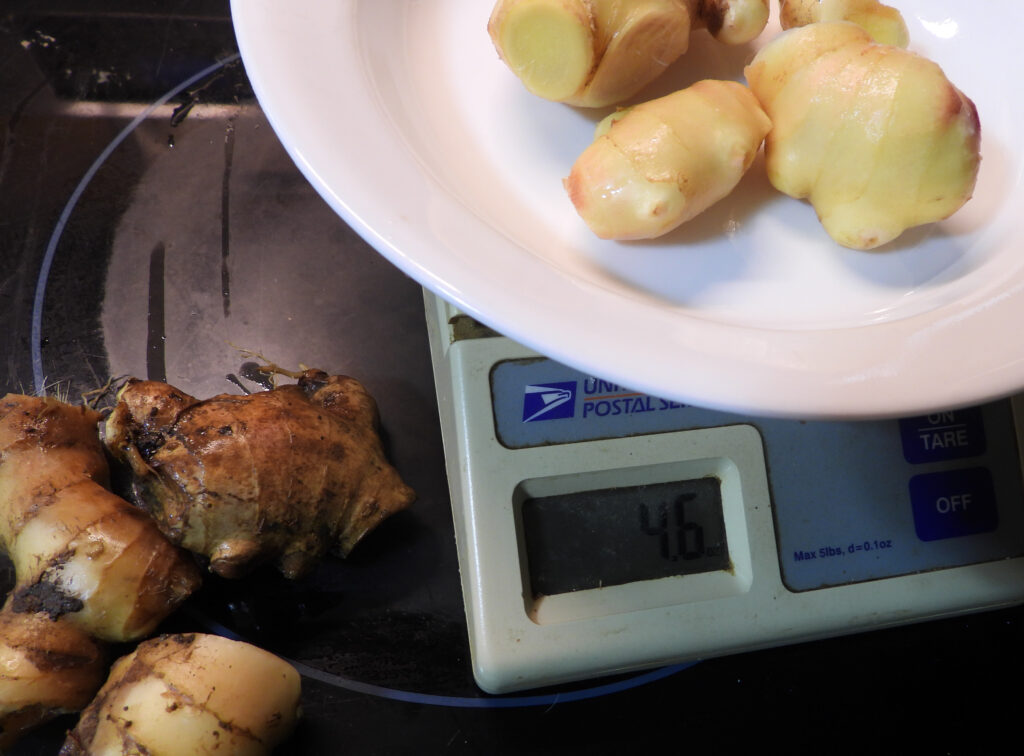
The ginger that kept its top turned out to be at its peak and made delectable pickled ginger. The plants that had died back came out of the ground with tougher skins (like what you’d find in the grocery store) and several were rotting.
Since pickled ginger is my favorite use for the rhizome and the recipe demands “baby” roots, I’ll aim to harvest before the first freeze next time. For folks who store their ginger on the shelf, you’ll definitely want to wait longer so the protective outer skin will form (although not so long you get the rotting I dealt with).
Not sure if that means harvesting immediately after the first freeze or before, although I suspect the trick is to start root pieces inside so the plants hit maturity before cold weather comes to call. I’d love to hear from folks who have experimented and figured the sweet spot out!
As a side note, growing ginger in a garden bed instead of in a pot definitely resulted in higher yields. And it was less finicky! So much so I might actually grow ginger myself next year rather than begging my mother-in-law to do the hard work for me.
In the meantime, I’m just enjoying my pickled ginger mixed into steamed veggies. That and hoping for more rain to boost our parched fall garden’s yields.
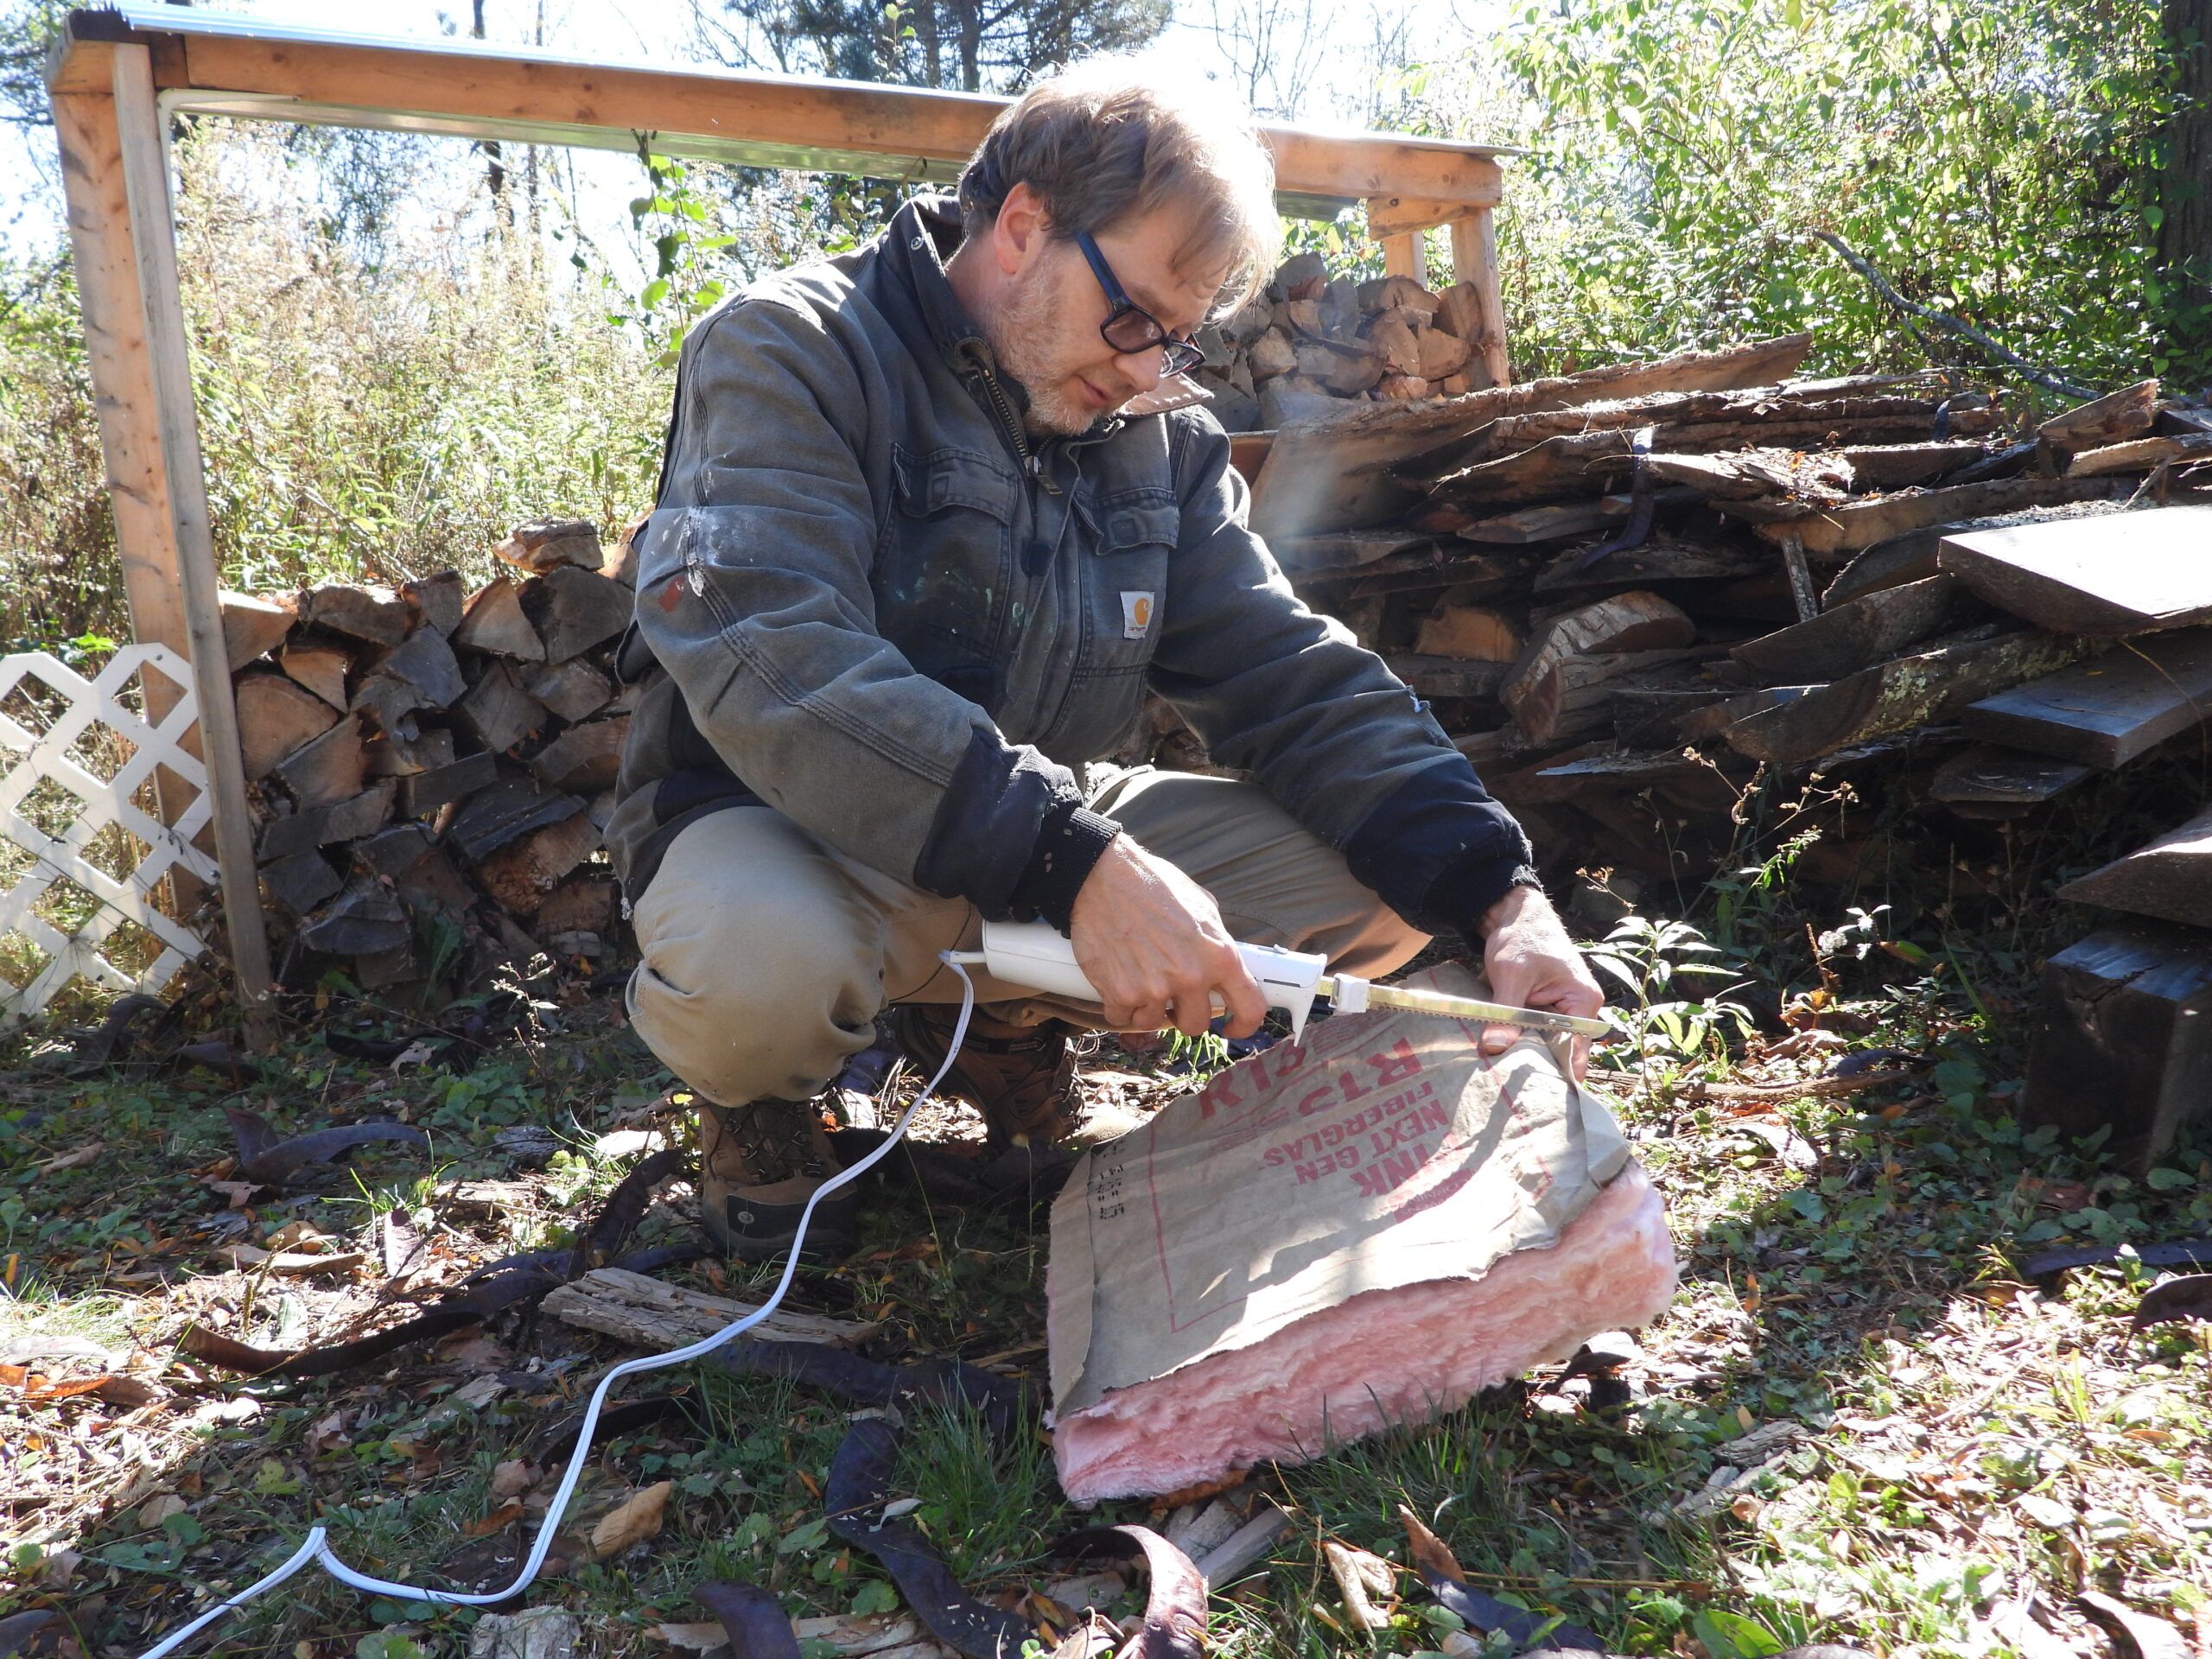
I learned the hard way during some recent insulation work that a pair of scissors is painful.
The standard method of using a utility knife on a hard surface is good if you have plenty of room.
An electric meat carving knife is much better and quicker. It’s light enough to use with one hand while you use the other hand to hold on to the insulation.
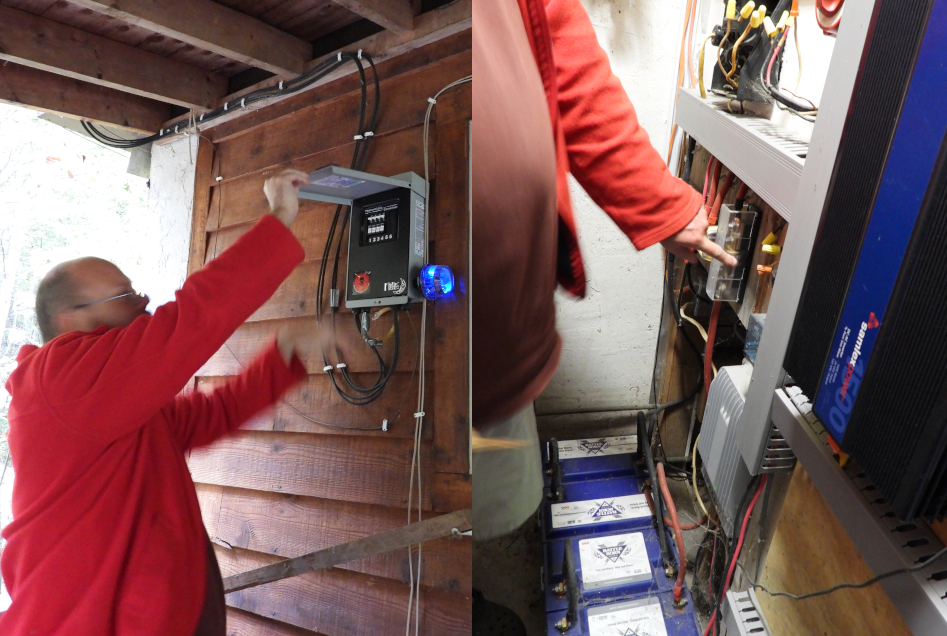
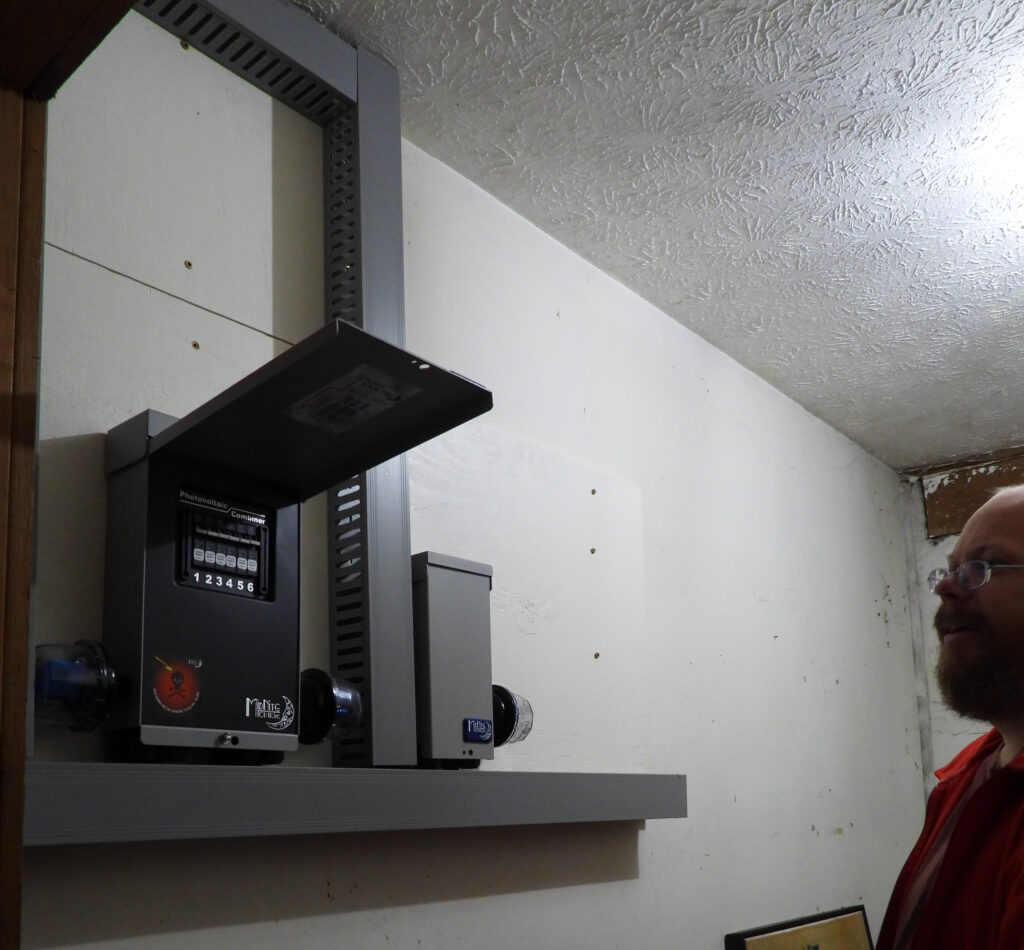
In my last post, I shared my brother’s journey to upgrade his off-grid home from the multi-decade-old original solar system to a new one that meshed with his needs in the modern age. But what did he do with the old panels?
The trouble with utilizing ancient solar panels is that they’re so much less effective than new ones that it often makes more sense to just replace them than to add them into a larger array. The panels don’t have to end up in the trash, though.
Instead, Joey came up with a clever hack that takes advantage of the panels with almost no supporting equipment. What’s the solution? He uses the old panels to pump water from his spring up the hill into a pair of large tanks. The result is free water pressure combined with enough storage to carry him through the dry summer and fall.
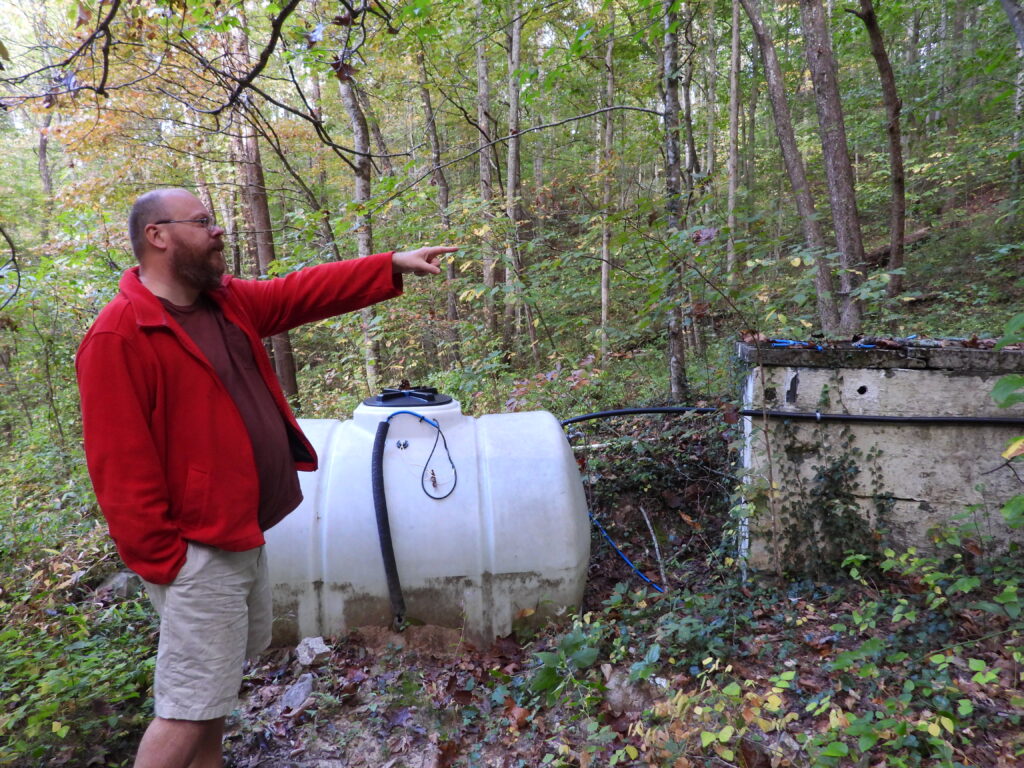
The system starts when water gravity-flows from Joey’s spring into a 500-gallon tank. On the right, you see the original spring box, which he’s bypassed.
Inside the plastic tank is a float switch and a pump intake. The switch turns on the pump when water reaches a certain level then turns it off when the water drops to another level. Zero management!
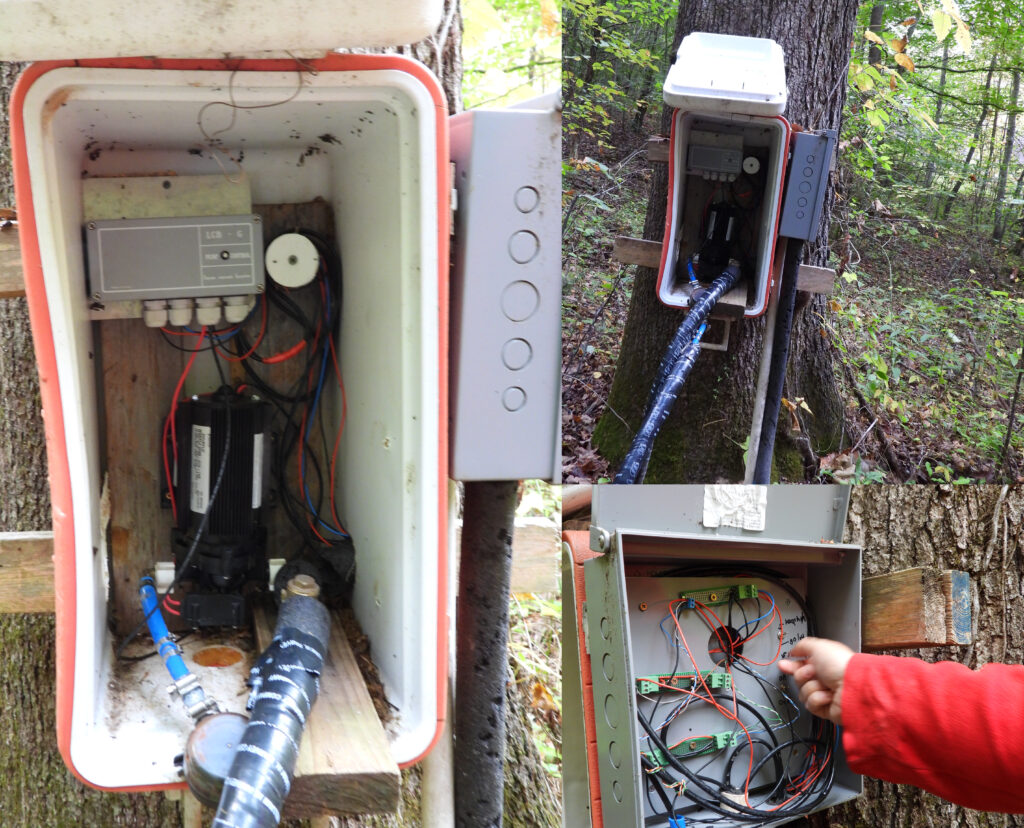
Of course, the pump is fueled by the sun. That doesn’t happen quite by magic, though. Instead, Joey made a pump house out of an old cooler that keeps everything dry while also channeling noise away from the house. A more traditional electric box connects the solar panels and pump.
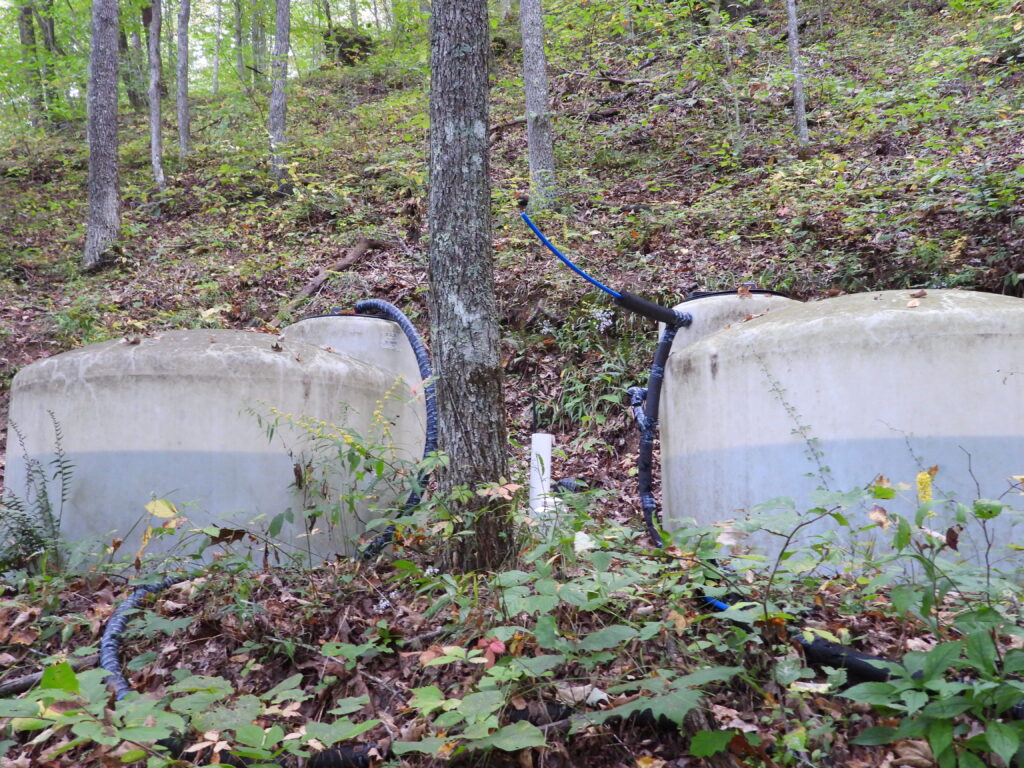
Water is pumped up the hill through pex tubing and into two 550-gallon tanks connected together. Then the water gravity-flows back down whenever Joey turns on his faucet.
The hill just happens to be high enough to provide 30 PSI!
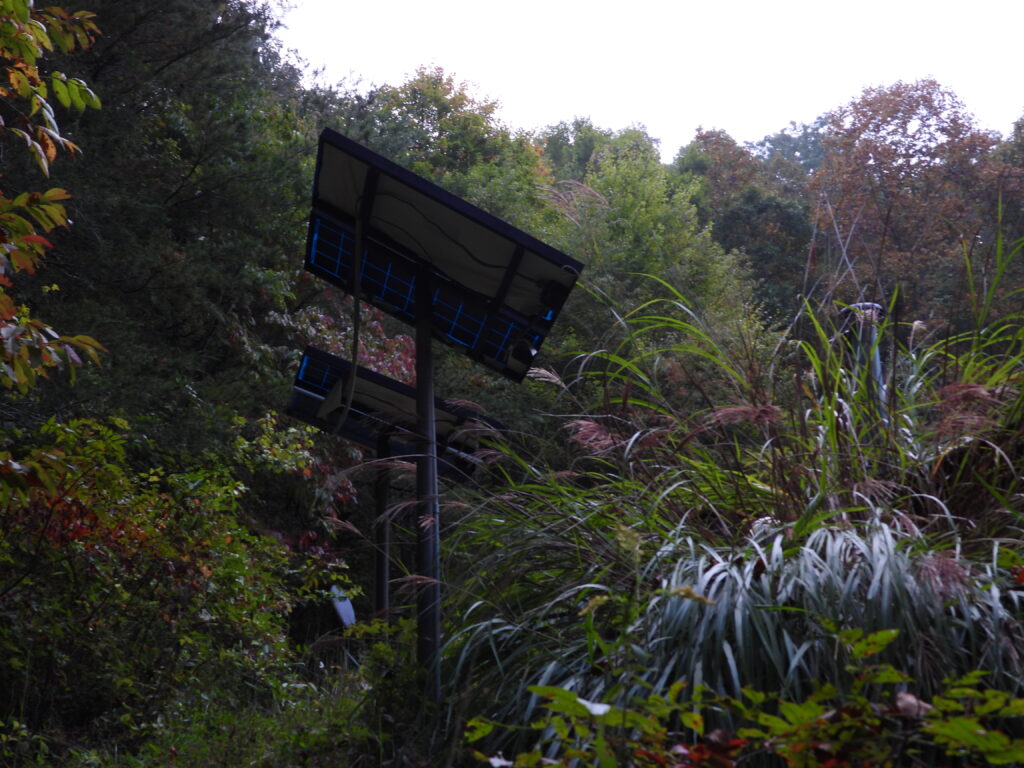
Joey installed his old solar panels on swivel mounts. Now, he wouldn’t bother — solar panels are so cheap, he doesn’t see the need to add fancy infrastructure to soak up every last bit of sun.
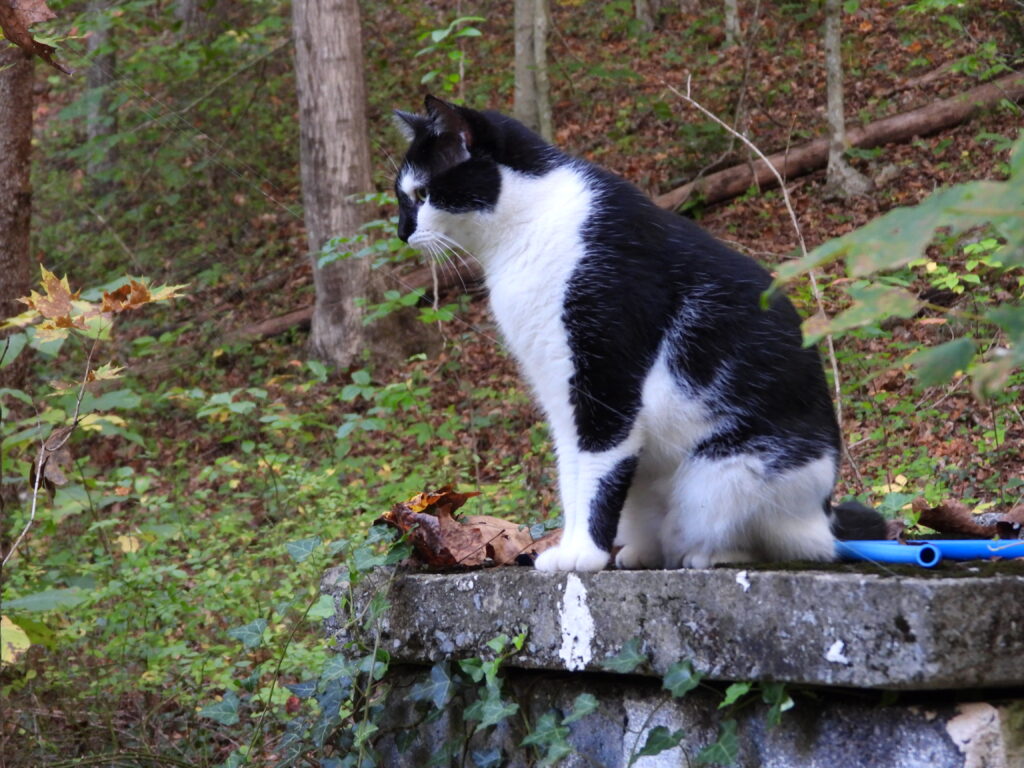
Otherwise, his water system is running perfectly! It’s even cat-approved.
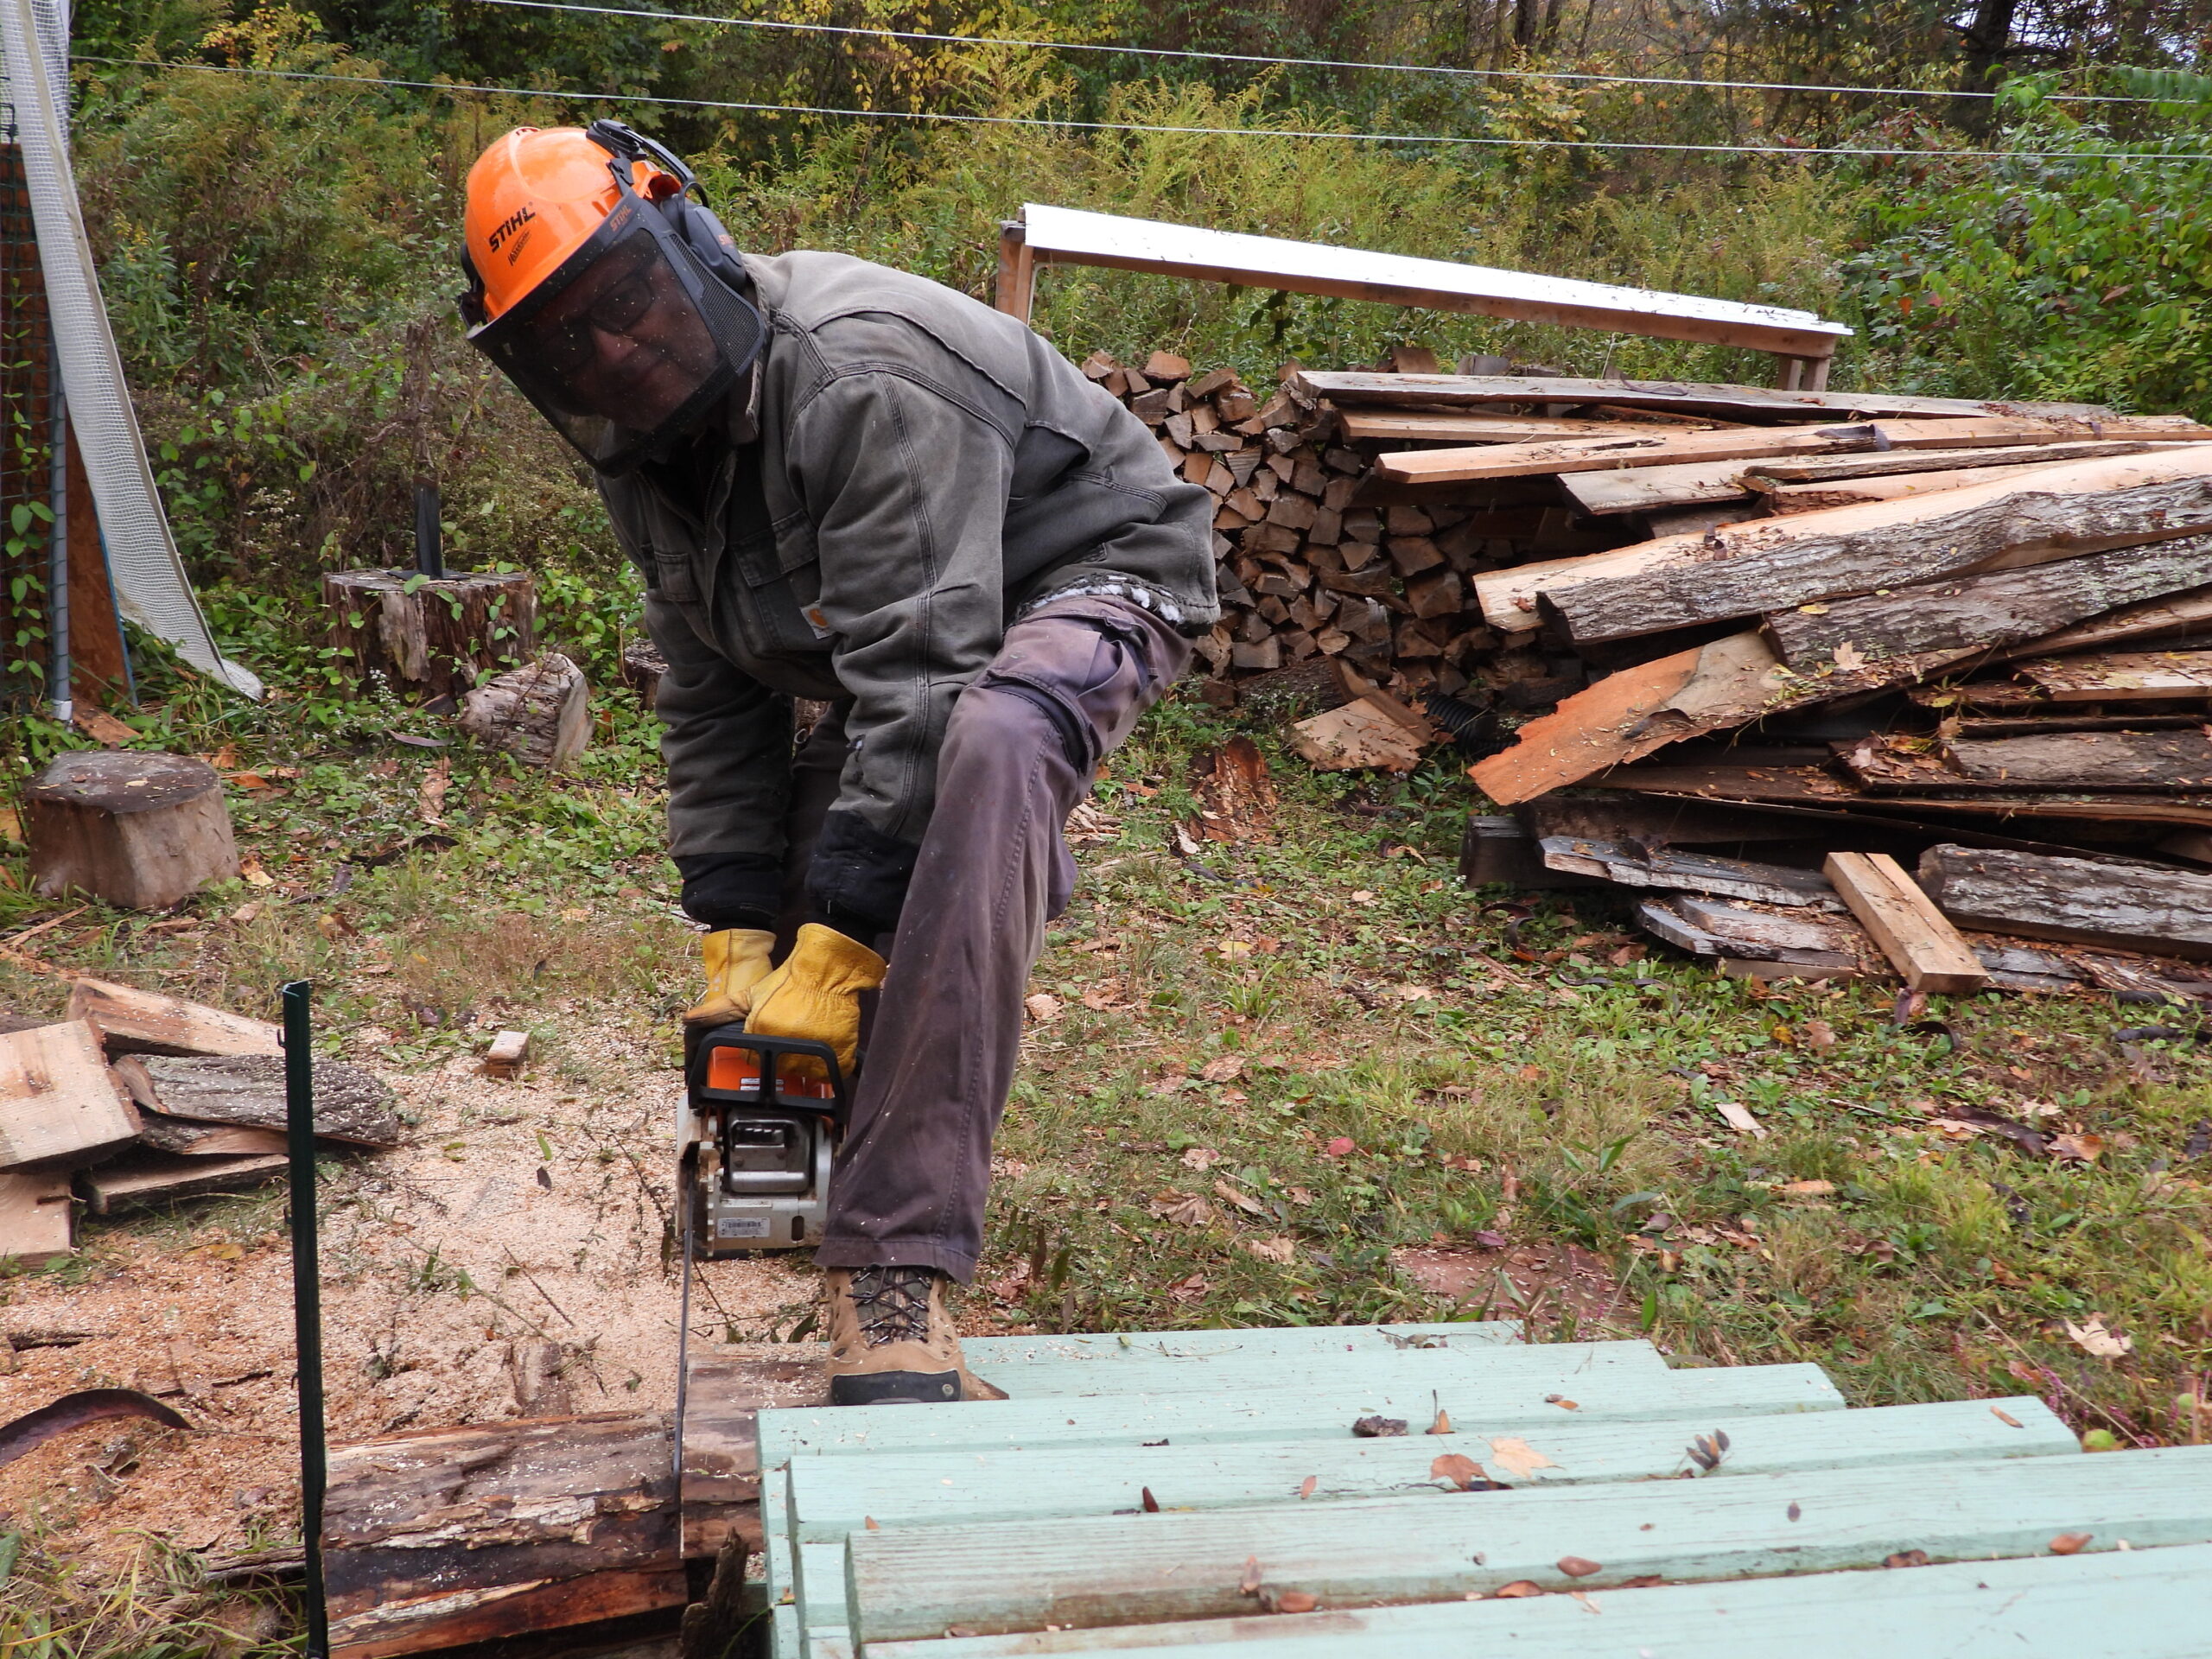
How do we cut up those long wood mill discards in just the right size for firewood?
We now use a fence post next to some porch steps.
Anna pushes the board up against the fence post where I cut a piece that drops straight down.
Slowly but surely we are filling up the greenhouse woodshed.
Remember my brother, Joey’s, underground solar house? Thirteen years later, I dropped by for a tour to see how it’s aged…and been reenvisioned.
Five years ago, Joey took out the old panels and installed a 1-kilowatt solar array.
It cost him about $2,000 at that time to pay for the panels and racking to install the new panels on the roof, although he notes that prices have gone down considerably since then. (More on that later.)
This allowed him to add on a satellite internet system (1.2 kwh) and a fridge/freezer (0.5 kwh).
A couple of years later, he spent $3,500 on four lithium-ion batteries, in part to bring him up to speed for the new panels and in part to prepare for further upgrades. Since then, he’s started adding in all of the associated wiring for upgrade part 2, the goal of which is to let him add a hot-water heater (6 kwh), an electric vehicle (variable, depending on how much you drive), and an induction stove (2 kwh) while never again dealing with low-power days.
The new system, which he hopes to bring online within a year or two, will involve completely covering the roof in solar panels (a roughly 10-kilowatt array). The solar panels aren’t anywhere near the most expensive part since he’s planning on buying them by the pallet-load, which will cost anywhere from $2,700 to $5,200 for 25 to 30 panels adding up to 10 kilowatts. He hasn’t pulled the trigger on this because, as we learned, delivery of a pallet to a rough-drivewayed homestead can be tricky! (Plus, he needs to change out his roof first.)
Other parts of the new system include about $500 on wires, $550 on charge controllers (about which, more shortly), $1,000 on combiner boxes/breakers/lightning arresters, and a whopping $3,200 on roof mounts. Total estimated cost (including the recently purchased batteries): $13,500.
(Of course, the full math also includes the federal tax credit he’ll get back as well. In some areas, there are )
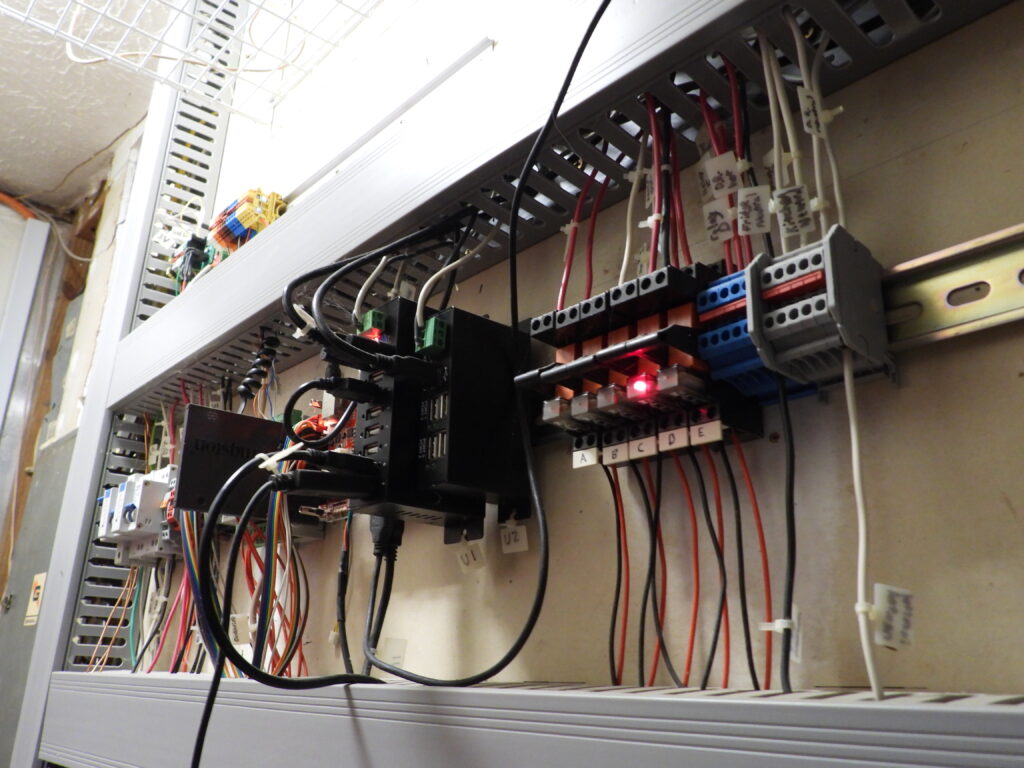
Sounds like a massive investment, right? That price tag still represents a huge savings over hiring an installer to come in and build the system. Joey estimates the installer cost would have been at least double what he plans to pay.
Joey wanted me to mention that his choice of charge controllers is very off-beat. He loves living far away from civilization, where birds and crickets are the only noises he has to deal with. He wasn’t willing to disrupt that tranquility with the usual charge controllers, which run a fan constantly.
Instead, he chose a cheap Epever charge controller that’s silent…but only handles one or two kilowatts. For upgrade 2, he installed more controllers, but will still lose half his power.
He’s okay with this because it ensures that, on a cloudy winter day, he’ll still have enough power. Since solar panels are so cheap, it’s now okay to overdo that part of the system.
During the first upgrade, Joey changed over from a 12-volt to a 24-volt system, which required him to change out the lights in the house. (You can decide whether you’re running a 12-volt, 24-volt, or 48-volt system based on the way you wire the batteries.) The benefit of a 24-volt system is that it lets him use industrial automation equipment, versus the automotive equipment you’d use with a 12-volt system. It also lets his charge controllers handle twice as many panels as they could otherwise.
I’m so glad you asked! That’s the topic of another post. Stay tuned!
If you’re on our email list, you’ve probably seen a lot of these photos already. But the truth is, I’m about to leave Mark holding down the fort while I travel south for yet another mini-vacation, so I don’t have much homesteading substance to share this week. Instead, I thought you might enjoy fun photos from other mini-vacations instead.
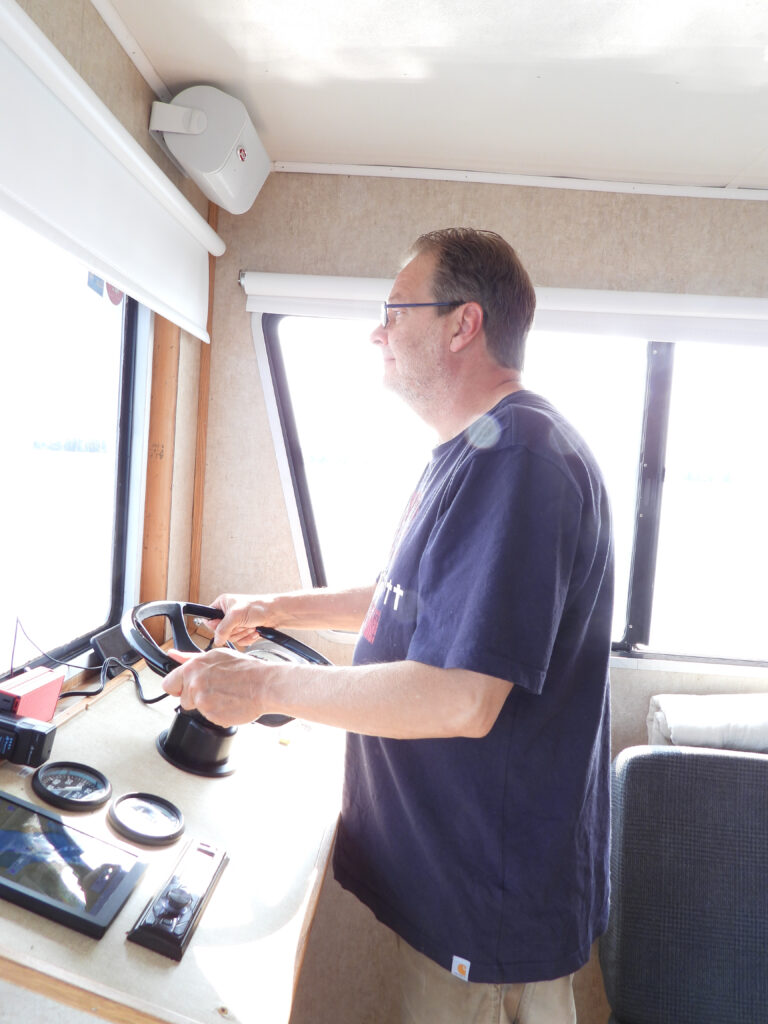
Starting with, above and below, Mark and my houseboat experience in Canada — more stressful than expected, but beautiful and mind-expanding.
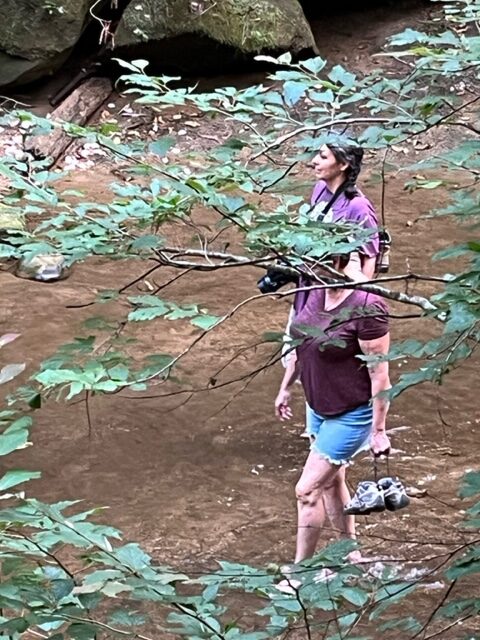
Below: Creekwalking with my older sister in the Red River Gorge area of Kentucky. The Rock Bridge Trail is not to be missed!
Totally out of order, the image below is from this past Saturday in which I attended a Centennary Scottish dance ball in Dayton (bringing along six of my students who’d just started dancing this year and who aced their first event!). No, you can’t find me in the picture — I was behind the camera.

The next shot is from a writing retreat I attended in the Hocking Hills this spring. The photo was taken with a timer while drenched through after a downpour — the only way to get those busy trails to myself.

Going further back in time, in March Mark and I met up with Mark’s cousin and cousin-in-law-to-be on Lake Erie. Birding the Magee Marsh boardwalk (birdwalk?) was almost as good as spending time with such good friends.

More recently, Mark’s been on multiple mini vacations learning to sail in Cleveland. But the image below is from close to home as he takes those lessons to the dinghy scale.

And here I am photographing mushrooms in the amazing Heart’s Content old-growth grove in the Allegheny National Forest. If you’re a mycophile, this place is not to be missed!

Looking back at all of these adventures fills me with gratitude and makes me so aware of how much I’ve changed since starting this journey. I’m gradually learning that an imperfect garden combined with a joyful life is far better than vice versa.
You’re all quite clever, so I’m sure you’ve figured that out already. Which brings me to my question — what are you grateful for right now?